
Changing guitar strings is one of the most recurrent practices any guitar player will encounter. Yes, it can be considered a tedious practice but this mindset can consequently lead you to develop bad habits. On the other hand, taking care of your guitar by knowing how to change guitar strings correctly and knowing how to give it a proper cleanup can, in the long run, help you be more consistent with the tone, feel, and playability of your instrument.
So, Is it ok to change all the guitar strings at once? The answer is, depends on the guitar. Acoustic guitars and electric guitars with a fixed-type bridge present no problems if you restring them all at once. In contrast, if you take all of the strings on guitars with floating-type tremolo bridges, it will become much more difficult to restring them, especially for beginners.
I will go more into detail on this, but the short explanation is that floating-type bridges function due to the tension the strings provide when they are tight. If you were to loosen up all of the strings, the bridge would collapse into the body. Not to worry, this wouldn’t do any damage to your instrument but it could either mean just a harder time restringing or a bit worse, having to readjust the bridge springs so it has proper intonation (which is definitely NOT what we want). On floating-type bridges, it is recommended you change at the most two strings at a time to prevent this from happening.
Before I get into how to change strings correctly on any guitar, let us explain the different types of bridges you will find.
If you are looking for the best electric guitar strings you can check my recommendation Best Electric Guitar Strings – How To Choose & Change Them
Types of Bridges
While there are many types of bridges, they are all split into two categories: fixed-type bridges and floating-type bridges, which are also known as tremolo bridges. For you guitar geeks out there, the reason why it is called Tremolo bridge is that tremolo is an effect where you change the pitch of note up and down. This effect can also be created with a floating-type bridge.
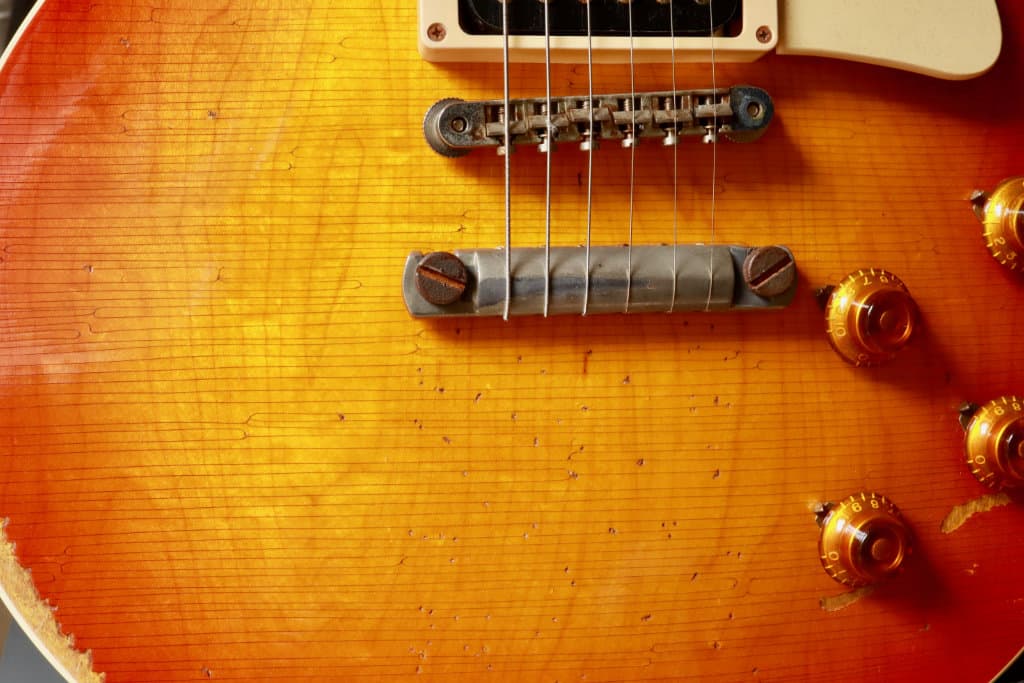
Fixed-Type Bridges
The two most popular fixed-type bridges are the Hardtail bridge and the Tune-O-Matic bridge. Essentially, their difference resides in the Hardtail being a bridge that consists of a sole unit, which is attached to the body of the guitar. The Tune-O-Matic consists of a disjointed bridge and a tailpiece. The Gibson Les Paul is a good example of this type of bridge.
Floating Type Bridges
For floating-type bridges, the two most popular ones are the Synchronized Tremolo bridge and the Floyd Rose bridge. The Synchronized Tremolo is most commonly found on Fender guitars and is much more stable than the Floyd Rose. The way the tailpiece interacts with the guitar bridge and the support the springs give make intonation and tuning issues less frequent and much more controllable. However, due to the nature of the bridge, the range that you can play with pitch-wise is far more limited than the one on a Floyd Rose. This is still not an impediment for someone as masterful as Jeff Beck.
The Floyd Rose bridge is far more complex than the Synchronized Tremolo and it requires some expertise to handle it. The main difference is that a Floyd Rose lets you lock the strings both on the bridge and at the guitar nut (where the first fret is). By having more places to lock the strings and by having individual “fine tuners” on each string by the bridge, you can do much more acrobatic stuff, Steve Vai-style. Other popular guitarists that use this to their advantage are Joe Satriani, Mattias Eklundh, and Eddie Van Halen.
The two main downsides are the instability it can have if not properly set up, causing continuous intonation and tuning issues, and the difficulties it brings to change strings. This leads us to the following:
The Proper Way To Change Guitar Strings
Let us discuss this process on guitars with fixed-type brides first. Even on fixed-type bridges, there is quite a divided opinion on whether changing all the strings at once has a risk of altering the setup on your guitar and/or damaging it.
I can confidently say that the only difference it makes is whether you wish to give your guitar an in-depth cleanup and, quite honestly, which process you are most comfortable with. Even people who have conducted a series of tests can confirm that changing all the strings at once does make a slight difference than changing one by one. This difference, however, is such a small amount that in the big picture, it presents no real problems.
The simplest way of explaining to you the process of changing strings on a fixed-type bridge is by following these steps:
- Remove old the strings. You can do one by one or all at once.
- Clean the fretboard and all dirty areas with a soft cloth. Keep your attention to the gunk on the sides of the frets. If you don’t have a maple fretboard you could use lemon oil after the cleanup.
- Slide new strings into the bridge and insert them through tuning pegs, keep the string a bit loose so you will have an extra wind or two on the tuning peg.
- Hold strings away from the guitar (do this one by one) and loop tuning peg clockwise until there is enough tension to hear notes.
- Retune every string to the desired pitch, preferably with the help of a tuner
- Stretch and bend all strings to remove all excess space in tension and retune. You might have to do this a couple of times.
- Clip excess string with string cutters and you are all done!
Changing Strings On A Floating-Type Bridge
This process is slightly more complex and can be a challenge for beginners, but with the proper materials, it can become quite an easy procedure. If you were to have a small block of wood (around 0.5 inches/1.27 centimeters width, 2.5 inches/6.35 centimeters height) that would definitely help you!
The block of wood is placed under the floating bridge to replace the tension from the pull of the strings. This will help you to avoid the bridge from falling and possibly altering the intonation. Once that is done, you can remove all strings at once and not affect the guitar springs.
The process is as follows:
- Place the wood block under the bridge.
- Unlock the clamps at the nut (3mm Allen wrench is needed, usually comes with guitar)
- Loosen up the strings to avoid aggressive snaps when you cut them.
- Cut strings between the guitar pickups.
- Loosen up lock-down screws on the bridge. Make sure to loosen up slightly as to avoid moving the block of wood.
- Remove old strings.
- Clean the fretboard and all dirty areas with a soft cloth. Keep your attention to the gunk on the sides of the frets. If you don’t have a maple fretboard you could use lemon oil after the cleanup.
- Using your string cutter cut off the ball-end of the new strings since they are not needed. Make sure you are able to identify the gauge of each string once you cut that part off!
- Insert each string on the bridge and tighten up the screws. Excessive force not needed.
- Feed strings through locking clamp at the nut and loop under tuning peg, keep the string a bit loose so you will have an extra wind or two on the tuning peg.
- Stretch guitar strings to remove all excess space. Proceed to tune up your strings!
- Once fretted all the strings and closely tuned them, remove the block of wood and make final tuning adjustments.
- This is a good moment to adjust the fine tuners. Make sure they are in the center area so you can adjust up or down in pitch if needed. This will be very helpful once you are doing final tuning details.
- Lockdown all clamps, cut excess strings and you are good to go!
Here’s a video of the process in case you need extra assistance
What If You Already Removed All Of The Strings On A Floyd Rose
Not to worry! There is always a solution.
You can still essentially do all of the steps noted above. You would need to use your tremolo arm to lift the bridge and put a block of wood or if you don’t have one you can use a newspaper folded in two, basically anything that won’t scratch the wood.
Another way, you should do it only if you want to take apart the bridge for a deeper clean. Loosen the tension on the bridge springs until it will rise and you will be able to access the string lock screw. As you put each string back you will need to tighten the tension on the bridge springs to bring it down because the string will start pulling it up. Also, keep in mind that as you rotate the guitar to adjust the springs you need to tighten the string lock so the graphite block that holds the string will not be dropped and you will lose it.
After that, you would follow from step 7 to step 12. Once you get there, you need to make sure that the tension of the springs on the bridge is right. How can you find this out? Once the strings are in tune, check for the alignment of the bridge with the body of the guitar. The bridge should be parallel to the body. If the bridge were to be angled down, it means the springs are too tight. If the bridge is angled up, the springs are loose.
This is where it can get tedious. You now have to adjust the screws on the back of the guitar where the springs are. If the springs were too tight (the bridge angled down), use a screwdriver and turn the screws counterclockwise. If they are loose (the bridge angled up), turn the screws clockwise. I recommend giving it at most half or quarter of a turn each time as to not force the process. After this, retune the strings. This will take more time because you will notice the strings will not stay in tune since they are adjusting to the changed spring tension. The bridge will rise or fall as well, as a result of the retune. You’ll have to retune them a couple of times until they are finally stable. Once that is done, check the alignment and repeat this process until the bridge is parallel to the body.
To make sure you understand the process, feel free to check the following video for support.
If you have doubts about doing this on your own, I would recommend for your own peace of mind that you take it to a guitar tech and have him check it out to make sure the bridge and the springs still have the proper tension. It is a fairly inexpensive request and you might also take the opportunity to have a professional guitar tech explain to you how to do it yourself.
How Often Should I Restring My Guitar?
How often you should change your guitar strings, depends very much on whether you are an occasional player or a touring musician. The rule of thumb is set at every 100 hours of practice/performance, which would probably be around 3 months. In reality, it depends more on the care you give to your strings after you play and how comfortable or uncomfortable you are once your tone decreases in quality and the playability of your strings is slower due to corrosion (which will naturally happen after some time).
To extend the life of your strings and preserve their tone for longer, I most definitely recommend getting a soft cloth and a string cleaner/lubricant and giving it a proper cleanup after you play.
In terms of which string brands are recommended, many players and so do I favor Elixir strings above all others because they tend to last longer due to a protective coating the strings have. Ernie Ball strings are also quite popular and have many different gauges, which gives you more options depending on your style of playing, if you use alternate tunings or if you just wish to have light or heavy strings.
If you wished to be very involved at some point in your music journey, I would recommend you spend some time checking out different brands and gauges until you can answer the two most important questions: “Do they sound good?” and “Do they feel comfortable to my hands?”
How Much Does It Cost To Restring A Guitar At A Guitar Center?
For fixed-type bridges, guitar techs as Guitar Center will usually charge around $25 and it would include a cleanup and any adjustments needed. Now, if this was a floating-type bridge like a Floyd-Rose, the changing of strings would cost you around $35 and if you needed a thorough setup, the price range would be around $60-$70.
Conclusion
Changing guitar strings can be a scary process, especially if you are inexperienced. It can also be a tedious task that might cause you some problems, were you to do it quickly without proper care. But as in the world of learning to play guitar, the most important lesson I can share with you is: Practice makes perfect.
So take some time to properly learn how to take care of your guitar and you will have much more control over your playing and your guitar maintenance skills!
If you found this article useful, you may want to save this pin below to your Guitar board.

2 thoughts on “Is It Ok To Change All The Guitar Strings At Once?”
Leave a Reply to Marcos Cancel reply
Recent Posts
When learning new songs have you noticed that some of the chord sequences sound really good? But when you tried to come up with your own chord sequence, or as we call it chord progression, you found...
Some guitarists insist on buying an expensive amplifier with their electric guitar. They assume that this is a must for every type of guitarist out there. However, in some situations, this isn’t...
Hey man. What kind of oil I should use with maple fretboards. Please let me know. Take care.
Hi Marcos,
You shouldn’t put oil on a maple fretboard.
you can read more about this in my post Best Fretboard Oil – How, When, On What To Apply It