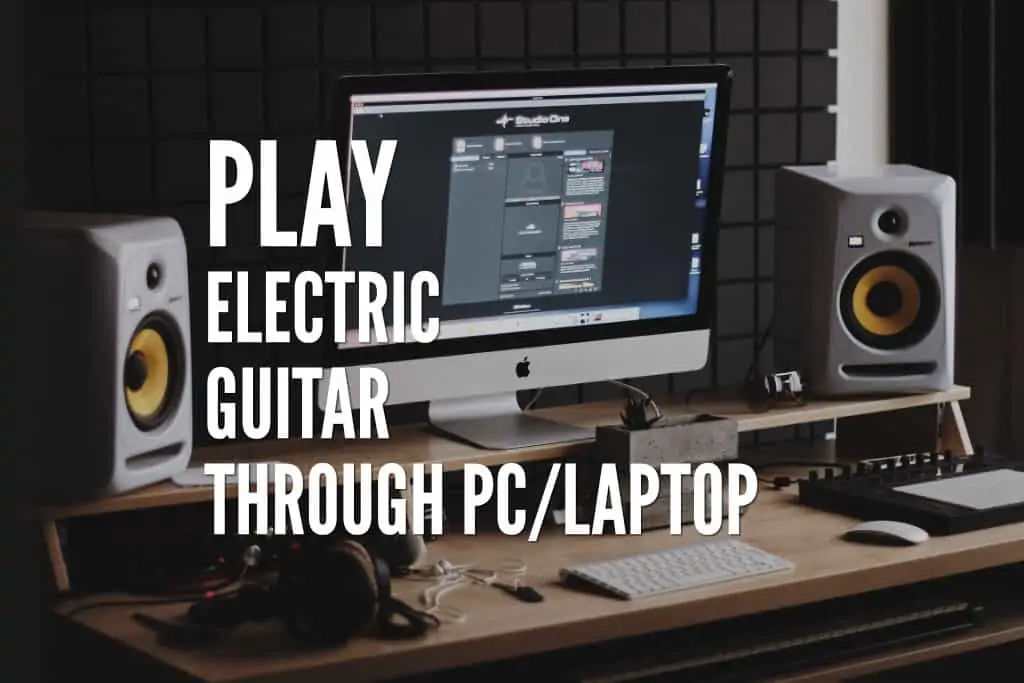
Some guitarists insist on buying an expensive amplifier with their electric guitar. They assume that this is a must for every type of guitarist out there. However, in some situations, this isn’t the case. In some cases, you even won’t need an amplifier at all and you can manage just fine by using your PC\Laptop as an amplifier for your guitar.
This can be an ideal way for beginners to be able to play their electric guitar at home but might not have a budget for a good amp. It can also be the case for guitarists who can’t crank up their amplifiers due to noise restrictions from their neighbors. Finally, this is a great tool for beginners who either don’t have enough pedals to shape their sound or lack the experience needed to alter their tone into a desired one.
The following ways will provide you a way to play your electric guitar using your PC or laptop. By the way, it will not matter whereas your computer is a Windows machine or a Mac.
However, all these methods will require some sort of additional hardware, some are cheaper than the others and the quality of it will be accordingly. I will assume that you already own an electric guitar and a guitar cable.
For those who are particularly interested in the prices, the most costly way on this list will be around $100, the others are way cheaper. Nevertheless, it will not come close to an amp with effects built-in.
Let’s take the Fender Champion 20 amp as an example. This amp is ideal for guitar players who play at home and in the same price range. The problem is, the Fender Champion 20 offers several effects in it, but you will not be able to chain them or customize them.
This can eventually be very limiting, especially if you want to try all those amazing effects and customizations. After trying any of these methods, these amps might end up at a garage or the back of a closet, not being used. This is what happened to mine.
Plug Your Guitar Into The Mic Jack

This is the cheapest way to connect your electric guitar to a PC or laptop. Assuming you already own a guitar cable you will just need a 1/8 inch male to 1/4 female adapter which costs around $5 so you will be able to connect your guitar to the mic jack.
You can also use a dedicated ⅛ inch male to ¼ inch male cable. But this has a drawback, this cable can’t be used to connect to an amp without a ¼ inch male to ⅛ inch female connector and although the cable is made by a well-known company, it isn’t made by a guitar company. Therefore, the cable itself may not be well suited for a guitar.
Another way is to use a ⅛ inch male to ⅛ inch male cable, also known as an aux cable with an addition of a ¼ inch male to ⅛ inch female adapter. However, I would not recommend this method. These cables were not designed by guitar manufacturers and you may experience major delays while playing. So if you choose any of these methods to connect your guitar, I recommend the first one.
Once you have all that you need you can just connect it to your computer, go to the sound settings and enable your recording device on the input section. You will then make sure the output section (“playback device” on Windows) of your sound has your speakers selected. Don’t forget to turn your volume all the way up on your guitar.
Here’s a video as support material for you
If you followed my instructions you will be able to hear your guitar through your PC or laptop. Don’t be alarmed if the tone in your guitar is super clean and bland and you end up wondering how you can put those juicy effects in. If this method is enough then you can skip the other two and go to the guitar effects software section in this article so you can apply the effects you want. However, I do suggest that you have a look at the other methods as well because they offer better quality.
Use A Dedicated USB To ¼ Inch Cable

- The latest edition of the fastest way to learn guitar and bass, newly...
- Get results fast with a proven method. Studies show that over 95 percent of...
- Learn at your own pace. Rocksmith adapts to your skill level, and now...
- Learn to play with your favorite songs; A new six-track bonus pack joins 50...
This is the method I use on a daily basis and this is the method I most recommend. The key to this method is using the right cable. I use the Rocksmith cable, which is part of a Rocksmith 2014 game that teaches you how to play guitar. It is an amazing game that has a lot to offer to every type of guitarist. You can learn songs, techniques, scales, chords, improvisations, and get better each day. The great thing is that they offer a special price for the game and the cable so this is a great deal. Apart from using that cable inside the game, you can use it with outer software as well.
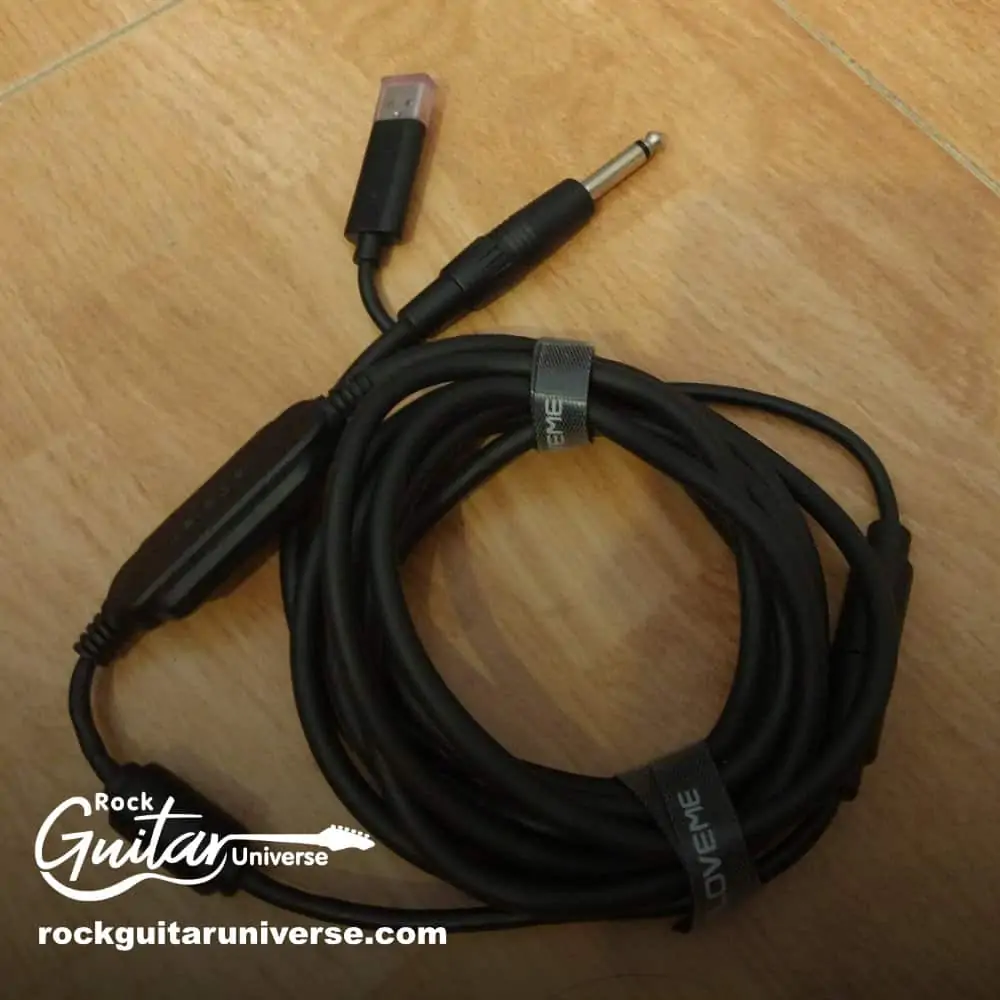
The first time I tried connecting my guitar to a USB port I tried to do it with an adapter and not a whole cable, actually I tried several of those but they all ended up with so much delay between the time you pick a string until you hear the sound. The next thing I tried was a dedicated USB to ¼ inch male cable. I bought one of those that had a red led indicator on the USB connector but this ended being a failure as well. At that time I found out about the Rocksmith game and was eager to play it, I bought it on Steam and was super excited. But when I plugged my USB to ¼ inch cable that game didn’t recognize and demanded that I will use a genuine Rocksmith cable so I was forced to buy a cable in order to play the game which at the end turned to be a great thing because I was able to use it outside the game as well and it didn’t have the issues that I had while I was plugging my guitar to the mic jack.
Use A USB Digital Interface
An audio interface is an external device that is essentially an improved sound card. This allows your computer to connect and process different analog or digital signals, such as microphones, instruments, and MIDI with much more sound reliability. An audio interface also provides a more accurate digital clock and superior analog circuitry that improves the overall sound quality.
This will take you one step towards sounding much more professional and it also opens the door for you to start considering recording good quality material. An audio interface is the absolute most important element in a recording studio, whether it’s a pro recording studio or a home studio.
There are many USB Audio Interfaces that come with a digital audio workstation (or DAW) for free. Some other interfaces come with their unique software to transform your sound though “amp modeling”, which we will discuss later.
Here’s one of the most popular USB Audio Interfaces purchased by beginner home studios:
Focusrite Scarlett Solo Best USB Audio Interface

- Pro performance with great pre-amps - Achieve a brighter recording thanks...
- Get the perfect guitar and vocal take with - With two high-headroom...
- Studio quality recording for your music & podcasts - Achieve pro sounding...
- Low-noise for crystal clear listening - 2 low-noise balanced outputs...
This is the simplest version of the Focusrite Scarlett Series. It comes with one XLR output to connect a microphone and an instrument cable output for guitars, bases, and keyboards. Both the XLR and the instrument cable outputs have their own pre-amp, which you can use to adjust the signal’s level coming from the interface into the computer. As for monitoring your sound, you have the Monitor knob and an input jack to listen through headphones.
It is important to understand that the Monitor volume output is routed to the line outputs on the back. These line output can be connected to your speakers and that’s where the Monitor volume knob adjusts the overall sound. In case you don’t own a pair of speakers, you can route the output of the Scarlett to go through your computer. This is done in the Audio Settings of your computer.
This particular bundle also comes with Pro Tools, one of the 3 most used DAWs in the industry, Ableton Live Lite, which is a software used for programming live performances, and a 3-month Splice subscription, where you can use recorded samples for your productions.
Use A Multi-Effects Pedal
Multi-effects pedals are a great choice for you especially if you are looking to eventually translate that into an amp so you can play live. A multi-effects pedal is a device that has many different parameters that will help you shape your sound. Most multi-effects pedals will have amp modeling included, a compression parameter, noise gate, and FXs such as reverb, delay, and other time-based effects such as chorus, flanger, and/or phaser. They will also include an expression pedal that can be programmed to control wah or become a volume pedal.
You can often find a USB port on a multi-effects pedal, which will be the way you can plug into your computer. On the budget pedals, this will be a way to manage the pedal and the presets. However, on the higher-end pedals, the USB connection will let you use the pedal as an audio interface a well.
For the higher-end pedals, the instructions are similar to what you will use on an audio interface, connect to the PC, download and install the drivers, fire up a DAW and that’s it.
As for the budget options, all you need is to connect the out interface into the mic input on your PC or laptop and enable the “listen to this device” option of the mic via the Sound Control Panel. Of course, you can’t do it without an adapter. Depending on your cable, which most probably will be a regular 1/4” guitar cable you will need a 1/4” to 1/8” adapter. If you have an aux, 1/8” cable, you will need a 1/8” to 1/4” adapter.
A multi-effects pedal is the best option if you are someone who enjoys the physicality of tuning in your sound (turning knobs and such) as opposed to having everything be on your computer.
Mind you, most good-quality multi-effects pedals will be expensive. However, there are some low budget ones that will help you start getting familiarized with how these devices work. If you do end up digging the way multi-effects pedals work, you will most likely have to re-invest in a better quality pedal.
Zoom G1X FOUR – Best Budget Multi-Effect Pedal

- 71 EFFECTS AND 13 AMP MODELS TO EXPLORE – Explore 71 built-in effects and...
- LAY DOWN LOOPS IN REAL TIME – Create layered riffs with the 30-second...
- A FULL BACKING BAND IN YOUR PEDAL – 68 built-in rhythm patterns give you...
- PLUG IN, PLAY, AND PRACTICE ANYWHERE – Plug in with standard guitar...
If we talk about multi-effects pedals, we have to talk about Zoom. Zoom is one of the top-leading multi-effects pedals manufacturers in the market and they have models that go from high-quality to low-budget.
The G1X FOUR is a great example of how Zoom can build low price pedals and still maintain a high standard for sound design. This multi-effects pedal gets some excellent tones and features 60 effects, as well as many, presets already tuned for you. You can also loop 30 seconds of music within the pedal, giving yourself a small jam track!
The Zoom G1X FOUR comes with USB connectivity that will let you manage the effects and upgrade the firmware if needed.

The Zoom’s G1X FOUR gets some surprisingly great tones considering the fact that it costs only around $100. It features 60 effects as well as 40 factory and 50 user presets that you can access easily. Knowing that it also includes USB connectivity and special software, amp and cabinet models, rhythm machine, and a looper – it’s definitely a great deal.
The last thing I’ll say about this is that unless you do have very much in mind translating your sound to an amp or you are not comfortable at all with shaping your tone on a computer, I would recommend you using computer-based amp modelers. They will be cheaper in the long run and you can still get great sounds from them.
Use A Guitar Amp

- Totally wireless guitar amplifier with newly developed BOSS technology...
- Compact wireless transmitter plugs into various kinds of electric guitars...
- Transmitter provides 12 hours of playing time on a single charge, and...
- Always ready to play, with motion sensing technology in the transmitter...
There are some amps that will have a USB jack on the back. Line 6 and Boss Katana amps are known for having that feature and it gives you the option to either play through the amp or through your computer, using the amp as an audio interface. The great thing about this is again, the physicality of adjusting your tone through the amp and just having the computer be your recording device or your sound output.
However, these amps will not be below the $100 mark we set at the beginning, so it is not the cheapest option and quite frankly not the best either.
Setting Up Your Pc As A Guitar Amp Simulator
We have discussed multiple ways to easily connect your guitar into your computer. However, we haven’t fully explained how to make your sound good. As mentioned before, when you plug your guitar through the mic jack/ USB cable or an audio interface, you can only get a clean, bland sound and you can’t add any FX or distortions to it. That is unless you use an amp simulator.
An amp simulator is essentially some sort of software that has been designed to mimic the tone you would get from using a real amp, such as a Fender or a Marshall Amplifier. These software programs will also give you the option to add compression, use different distortions and FX to shape your sound in any way you can potentially imagine. This is what multi-effect pedals do.
There are several amp simulators out there, and some are cost money while others you can download for free. I believe that for beginners the standalone software is the easiest way to start.
Guitar Rig
Native Instruments is the top leading software creator for music. Whether it’s synths, drums, piano, or bass simulators, they always take their quality to top levels.
Guitar Rig 7 PRO is the ultimate guitar studio that includes 17 vintage amp models, 27 amp cabinets, 54 FX, and 16 microphones to position within the studio to give you unlimited options to modify your sound. It also comes with 400 presets to give you a head start. You can also buy different packages to expand your sound. Of Course, they also have the free version, Guitar Rig Player with fewer options available. But it will get you started.
If you want to know more about amp simolators but don’t want to buy a lot of expensive software, you can check out my post 19 Best Free Standalone / VST Guitar Amp Simulators For PC, Mac
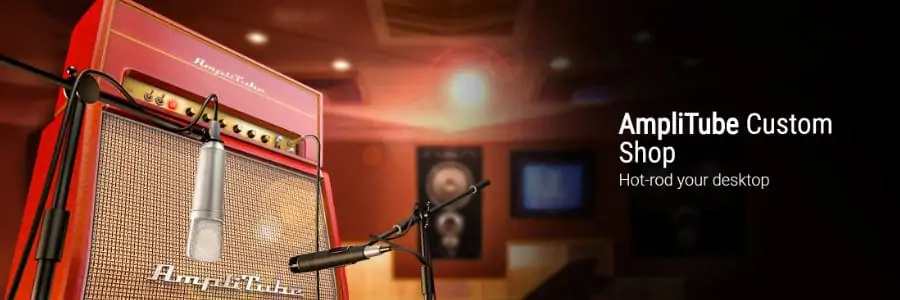
AmpliTube
IK Multimedia is one of the best music software designers out there, especially concerning beginner packages for someone who is just starting to get used to the digital world.
AmpliTube is an amp simulator that allows any and all guitarists to achieve an excellent quality tone. AmpliTube gives you a ton of amp models, cabinets, effects, and settings to work with. It’s like having a whole studio’s worth of equipment right in your own room. There is no real limit to the sounds you can make with it. You can also download and share different tones with the Amplitube community.
The amazing thing about it is that IK Multimedia is often quite generous with their free software. The AmpliTube model called AmpliTube Custom Shop is a free version that has enough amp options for you to begin experimenting and also getting a feel for what the software is and how it works.
I would strongly recommend you give AmpliTube Custom Shop a try and if you like it you can look into purchasing the full version. You can also add different packages that are cheaper to your arsenal of AmpliTube amplifiers and pedals.
Line 6 POD Farm
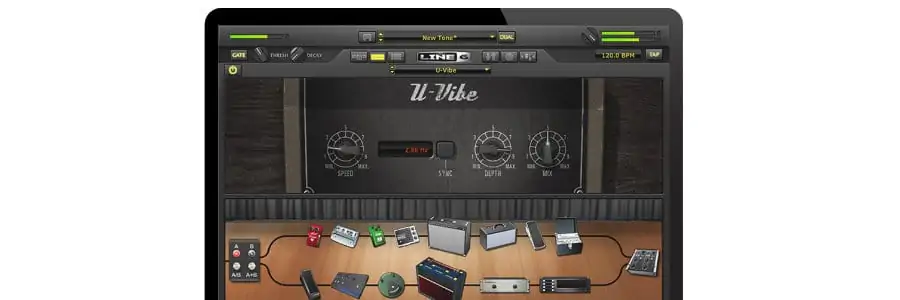
Line 6 creates excellent amp modeling software. This is on par with Amplitube. Use it with whatever guitar interface you have. it pairs well with Line 6 guitar interfaces like the POD studio the best. It has 16 guitar amps, 24 effects, 20 stompboxes, and 6 microphones. You can expand the program with plugins such as amp farm for even more map models and choices. There is a mobile version that works with your iOS device. The standard version is also not that expensive. Line 6 has an extensive online community to trade your own tones or download tones from others. Use the community to get tones to popular songs you want to play. This can save you a lot of hassles coming up with your own tones.
Conclusion
There are many affordable options to be able to play music through your computer. Whether your intention is to find a quick way to practice or develop a space where you can begin creating and shaping tones for your “library” of sounds, I am sure one of the options listed here will work for you.
In all honesty, Amp Modeling Software changed the game and is one of the most effective ways for you to let your creativity and imagination get the best of you. So don’t be afraid to explore these options and once you get used to it, the world of guitar tones will be at the palm of your hands.
Good luck and keep on rockin’!
If you found this article useful, you may want to save this pin below to your Guitar board.
Last update on 2026-07-15 / Affiliate links / Images from Amazon Product Advertising API
2 thoughts on “5 Easy Ways To Play Electric Guitar Through PC/Laptop”
Leave a Reply
Recent Posts
When learning new songs have you noticed that some of the chord sequences sound really good? But when you tried to come up with your own chord sequence, or as we call it chord progression, you found...
Top 50 Free Realistic Guitar VST Plugins With Sound Examples
As technology has rapidly advanced in the recent decade, computers are stealing more and more roles from physical musical instruments and accessories. Nowadays, you do not need expensive amps,...
This is very informative. I also want to know how to get the output from the computer to sound like an amp using the audio interface
Thanks!
you can check the section “Setting Up Your Pc As A Guitar Amp Simulator” in this article for this information