
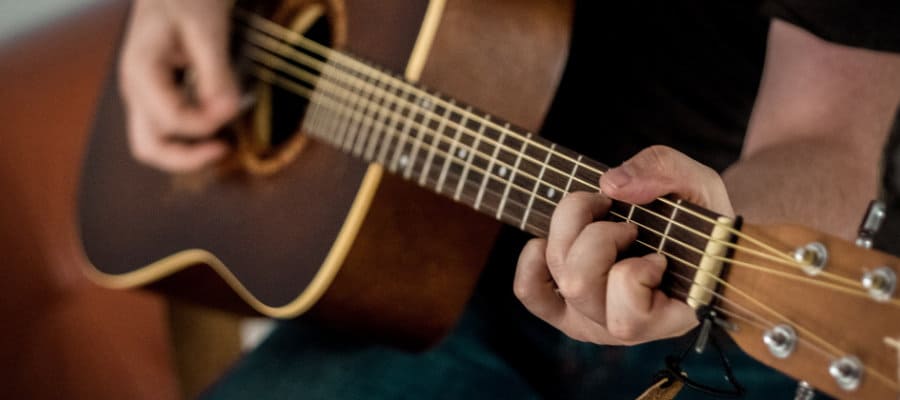
One of the most difficult things to learn when you start playing the guitar is chord changes. While in theory, it’s not always so difficult in practice it can get quite hard.
For example, there are songs with two or three chords only, and yet, beginner players will struggle a bit before they are able to play everything perfectly.
One of the main issues is switching between chords is fingering. Some chord changes are easy and won’t require much effort.
However, there are others where you will need quite a lot of practice before you manage to keep fluency while playing.
We will go through several tips and exercises that might help you with this problem.
if you feel like your fingertips are not strong enough while playing then make sure to check my 11 Easy Tips on How To Toughen Up Your Fingertips
Start Slow
Don’t try to learn everything overnight. Many teachers say that if you learn something fast, you’ll forget it fast. So learn slow.
Take your time. If you spend enough time learning something, you will never forget it.
With enough time spent on chord switches, it will eventually become like riding the bike. We all want to play as fast as Steve Vai, there is no secret in that. But even he needed to play countless hours and to have a constant practice before he managed to achieve those lightning-fast solos.
The main reason why you should start slow is to be sure that everything you do is right. Muscle memory makes no difference if something is right or wrong.
One of the best things you could do is to use the metronome to practice this. Start by setting the lowest speed and play this strumming pattern over the chord progression you chose. When you managed to play at this speed without mistakes, increase the tempo and continue.
The last thing you want is to learn something that’s not right and spend hours practicing until it becomes a part of your muscle memory. You will need even more time to correct something like that. So take your time and start slow. Eventually, the speed will come.
If you are still not convinced why you should practice with a metronome, check out my post 15 Important Reasons To Use A Metronome As A Guitar Player
Start With Triads And Open Chords
Chords are built with three or more notes played simultaneously. If you play three notes at the same time, you will get a triad chord. Of course, there are also diad chords where you will use two notes at the same time, but they aren’t counting as chords, but more on that later.
Triads are the simplest form of chords. You will use only the root and two other notes from the scale, depending on which chord you need.
For example, for a major chord, you will use the root, major third, and perfect fifth, while for the minor chord you would use the root, minor third, and a perfect fifth.
In the example of C, for the major version, you would have the root note, or C, major third or E, and perfect fifth or G. Your major triad would be C-E-G.
For the minor one, we would still have the same root and perfect fifth with the only difference that the minor third would be used instead of major. The minor triad for C is C-Eb-G.
The best idea for beginners would be to use the simplest forms of chords like triads when starting. Six-stringed barre chords might be difficult to start with, so keep it simple.
Naturally, the other most popular and easiest way to play chords is to use open ones. When we say open chords, we usually mean the chords played at the top of the neck where you would fret only certain strings while others would remain unfretted.
For example, the thickest string in standard tuning is E, so you will have no need to press that one. For E minor, you would press only the second fret of the fifth and fourth strings to get a full six-string chord.
This way, when you use open chords, it will be much easier to switch between open ones instead of using the more complex chords.
Start With One Shape
Since the guitar is using lots of the same shapes when playing, it might be a good idea to perfect a single shape before you proceed to play others.
This way, when you add more chords to your repertoire, you will be able to play them easier, and won’t have to spend additional time practicing the ones you already mastered.
The main thing about shapes is when you learn one chord, you actually learned twelve. If we take F major, for example, you move everything for one fret and you get F# major, one once more and you have G, and so on.
This way you get twelve chords for each shape that you learn. One of the exciting things when it comes to learning guitar is these shapes.
While it might get a bit complicated, by practicing you will realize how much you progress with each shape that you learn.
Barre Chords

As we mentioned before, using barre chords can be really useful. However, it can also be a bit difficult for beginners. Barre chords are played on five or even all six strings.
The biggest issue with barre chords is that your index finger usually has to press all six strings and that can be hard. Beginner players often need to practice a bit before they have the strength needed to play these chords.
However, as we mentioned in the previous example, you will need to learn a few shapes that will allow you to play dozens of chords. This way, if you perfect barre chords technique, you will change chords with ease since all of them will have the same fingering.
It is worth mentioning that barre chords aren’t really beginner chords, but you will have to tackle them eventually. So, it might be a good idea to start practicing them a bit as you progress with other things.
Muscle Memory
Even though it sounds like something that our muscles might remember, it all goes from the brain. There is a part of the brain that is in charge of movements, and if you repeat something enough times, your brain will remember it for quite a long time.
So if you repeat a certain scale a thousand times for example, in a few years you might forget how that specific scale went. However, if you pick the guitar, you will probably play it without a single mistake. This is thanks to our muscle memory.
The same thing will apply to chords, shapes, and progressions. So the point is that you’ll need to practice a lot to improve your muscle memory. But it will undoubtedly improve your chord switching speed.
For more information about muscle memory, check out my post Improve Guitar Muscle Memory With 15 Easy Tips
Work On Individual Chords First
it is always a good idea to practice one thing at a time. You should work on individual chords first before you start putting them together. When you start learning, it might be tempting to try to shove as much knowledge as possible.
Unfortunately, this won’t take you far. You will forget everything you learn this way unless you do it properly. And the proper way is to take it slow.
By starting simple and building your knowledge slowly, everything will fall into place after enough practice. So the best thing you can do is start with individual chords and work on them first.
After you are satisfied with the way some chord sounds, you will progress to the next one, and continue playing them both.
Just remember that every note in the chord needs to be clear. It is difficult to play certain chords and many beginners get the right shape, but not all notes can be heard clearly and without buzzing.
So be sure that you worked enough on each individual chord before you start putting them together. This will ensure that you have the right foundation and that you can play chord progressions where each sound will be in the right place.
Learn Basic Strumming Patterns
There are many strumming patterns but let’s start with a few of the most basic ones. The strumming pattern is a combination of upstrokes and downstrokes while playing chords. You will fingers a certain chord, and you will hit all of the strings for that chord. However, if you keep hitting all the strings downwards, it might sound dull and lifeless. What you should do is to use the combination of stroking strings from up and down in a certain combination.
One of the most used ones is two upstrokes, two downstrokes, one up, and one down. Try to memorize this one, and practice it a bit.
The idea is to give you an idea of tempo and when to switch between chords. If you play this for one bar, and then switch chord, you will get a decent sounding song. All you need to do is to practice enough until you get the right speed.
This will allow you to naturally progress instead of trying to play the song at high speed from the beginning. Trying to play something extra fast without getting that speed will result in many mistakes and sometimes beginner players might not even be aware of these mistakes. So take it slow. Speed will come in time.
If you are interested to learn more about strumming patterns you can check out my post 13 Easy Guitar Strumming Patterns From Well Known Songs
Think Ahead

One of the best advice you’ll get when it comes to chord switching is to think ahead. This means that while you play one chord, you should plan and think ahead of what your next chord will be.
If you do this, you will be able to prepare a bit, and especially if you are a beginner, to adjust your fingering to the new chord that you’re going to play.
As always, it might take a bit of practice before you are able to think about both the chord you’re playing and the next chord you need to switch to. This will undoubtedly improve your speed and fluency with chord switches.
Stay Close To The Fretboard
Now, this is important. While it might sound strange, it will save you a lot of time in the future. You should practice anything that you play while trying to stay as close to the fretboard as possible.
What you want to avoid is lifting your fingers too much and letting them get away from the fretboard while you switch chords.
This is also important when you play scales or anything else. By keeping your fingers close to the fretboard, you will need less time to place them on the next fret or string.
The “road” they will have to travel will be a lot shorter and this will allow you to switch chords faster and with more fluency.
Practice Placing Fingers At The Same Time
Another technical part that might save you some time is to try placing fingers at the same time. Usually, beginner players will start placing fingers one at a time. This is wrong since it will take you a lot more time to place all four fingers on the fretboard.
The ultimate goal when it comes to chord switching is to place all fingers at the same time on the fretboard. This will allow you to achieve that speed of light when it comes to switching and to instantly change between each chord.
Naturally, it will take you a bit before you master this, but it is a good idea to start practicing like this from the beginning to avoid wasting your time in the future.
Visualize
If you are a visual person, it might help you to try visualizing the chords that you need to play. Whether it is one chord only or several played in some order, you will need to imagine everything before you start playing.
Take your time. Music is never about who can get to the finish line faster. You need everything to be proper before you can continue to more complex problems. Visualizing your next chord might help you improve the speed of your chord switching.
Stay Relaxed

Try relaxing as much as possible. It is ok to struggle sometimes. We all did at one point. Switching from open D to open G wasn’t easy for anyone. So take as much time as you need. It is important to stay relaxed because it will allow you to progress much faster.
If you are cramped, it will only make it more difficult. You need your fingers to move fluently and without any issues, and if you are nervous or not relaxed in any way, it will make it hard.
This is why it’s so important to remember that no one was born as a guitar virtuoso, each of the amazing players had to get there with practice, and that practice included chord switching as well.
So you are not alone. Take your time and practice. Eventually, you will be impressed by your speed when it comes to playing the guitar.
Use Pivot Finger
Pivot finger technique is one of the techniques to improve the economy of motion of your guitar playing. If you take a look at common chords, you might notice that some of them have the same note.
For example, open C chord will have the same first fret second string note as A minor. If you have a chord progression where you need to play C major and A minor (or another way around), you could use that note as a pivot point.
The idea is to keep pressing that fret and move other fingers around it to form A minor chord (or C major, depending on the chord progression). There will be no need for you to lift that finger, only to place it on the same fret and on the same string a moment later.
You should experiment a bit and discover these pivot notes for the chord progressions. Naturally, sometimes will be much easier to move everything because the chord might require a different or unusual fingering.
However, it might be a good idea to take your time and experiment a bit with this. It is another one of the tricks that might help you improve the speed between each chord that you’ll play.
Keep The Rhythm Going

You don’t want to chase the song, or the song to chase you. You should go as the rhythm commands. If you are practicing, you are the one that dictates the rhythm and everything.
One of the ideas many players use it to tap their foot on the ground to create a sense of rhythm. Practice doing this because playing on time is one of the most important things in music.
Repeat Figures
Find figures that you like and repeat them until you get sick of them. And then repeat more. Repetition is the key to improving your muscle memory. Start with two chords and practice repeating these figures. After that play different chords or add a third, and so on.
This will help you switch between each of the chords individually before you proceed to play songs. It might not be the most interesting thing in the world, but it will get you far.
You should also practice figures in different positions or order.
Experiment With Fingering

There is no “right” way to play some chord. There is only a common way. Many teachers will say that you should play a certain chord in a certain way, where each finger will have its own place. However, while this is not inaccurate, it is also something that might not always be right.
There are so many ways you could play a certain chord, and some people prefer one way rather than another.
For example, you could play an open G chord with the index and middle finger on the fifth and sixth strings, but there are many players that prefer using the ring finger and middle for this. The reason is that you could easily switch to an open C major from this position.
As you can see, both ways are good and the only important thing and the only thing that matters is that you play the right notes and that each of them can be heard loud and clear.
So feel free to try something else, you might find that one way works better for you. Remember that the only thing that matters is the right notes no one cares which finger you use to play them.
Naturally, the “correct” way will usually be the most economical and easiest, but sometimes there might be another option so feel free to experiment a bit.
Practice

We left the best for the end and the one that everyone hates to hear – practice. In the end, the only way you could improve your chord switching speed is to practice.
None of these tips will help if you don’t spend hours repeating chords and switching between each and every one of them.
Whether you practice chord switching through some interesting strumming pattern or if you opt to use fingerpicking instead, it is vital to continue practicing. Both chord switching speed and muscle memory can only be improved through repetition.
There is no shortcut where you’ll be able to perfect something without investing enough time. The time you’ll need to conquer chord switching will depend mostly on the time you invested in guitar playing and practice.
It is worth mentioning that the consistency is rather important too. While it is exceptional if you could devote ten hours each day, it is not necessary. You can learn how to play guitar with less time invested.
It is normal that you can’t afford to play guitar for ten hours each day. You either go to school, or you have a job or any other thing that you need to do.
But the consistency is what is important. If you can afford an hour a day for guitar practice, that works too. The important part is that you need to practice every day.
If you play for ten hours one day, and then do nothing for the rest of the week, you will have much lower progress compared to someone that played for an hour each day of the week.
So keep in mind that time is important, but consistency is even more important when it comes to practice.
Examples And Exercises
There are so many exercises that will make learning interesting and we will go through a few of them.
Naturally, we won’t go through each possible exercise for chord technique but we will go through some of them that might get you on the right track and give you something that will help you improve your guitar playing skills.
Exercise 1
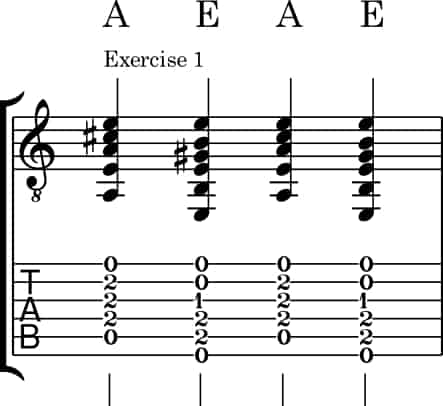
Tale two chords and practice switching between them. Start slow and try to build speed over time. You can take any two chords that you like, but it is a good idea to start with two open chords like A major and E major.
These chords are also important because they are based on the low E string and the A string. They are also the basis for barre chords.
Exercise 2
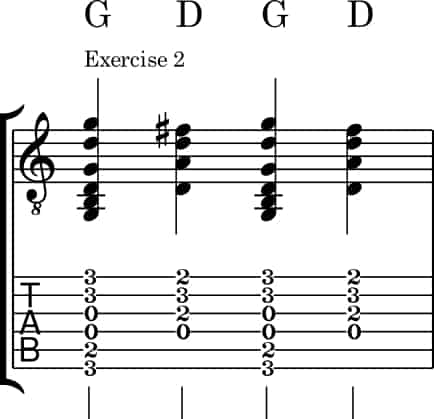
This is another two-chord exercise, but it is important because many beginners struggle with switching between G major and D major chords. You can also use the ring finger as a pivot finger which we mentioned before.
This way, your other fingers will move around the ring finger which will stay in one place throughout the entire exercise. Once again, you should start slow and build your speed over time.
Exercise 3

This is a simple chord progression that you can use to improve both G to D changes as well as adding A minor chord. It is one of the most common chord progressions and you might even recognize a few songs that use this.
Exercise 4
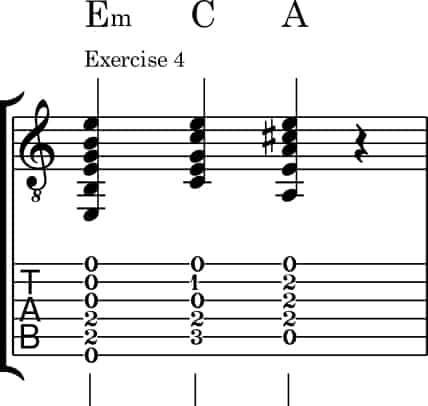
Now, let’s do the one with C major. You will start with E minor, switch to C major, and end with A major. Start slow and practice switching with these three chords.
Exercise 5
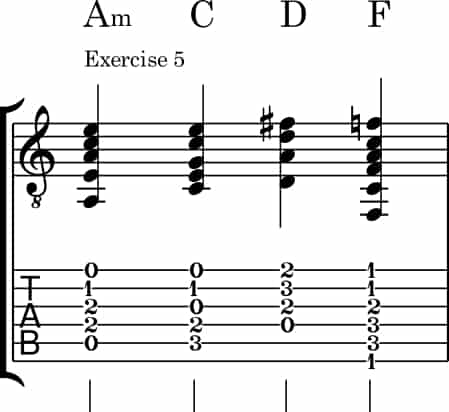
This one is to spice things up a bit. We have four chords that you need to play – A minor, followed by a C major, followed by a D major, and finally F major.
As you can see, for F major you will have to play all six strings where the index finger will fret the entire neck on the first fret. It might not be the easiest thing to do, but you should start practicing barre chords as well.
Interestingly, these chords are used to play House of the Rising Sun by the Animals, so if you could always practice along with the recording when you improve your chord switching speed.
If you feel like these exercises are not enough for you and you want to practice more you can check out 15 Famous Easy Guitar Songs With 3 Chords For Beginners, a list I compiled just for you.
If you found this article useful, you may want to save this pin below to your Guitar board.

6 thoughts on “17 Tips & 5 Exercises To Improve Your Guitar Chord Changing”
Leave a Reply to Brian Cancel reply
Recent Posts
When learning new songs have you noticed that some of the chord sequences sound really good? But when you tried to come up with your own chord sequence, or as we call it chord progression, you found...
Some guitarists insist on buying an expensive amplifier with their electric guitar. They assume that this is a must for every type of guitarist out there. However, in some situations, this isn’t...
What a really well written and honest article I am at the point of a kind of stagnation! Stuck at a certain point of progress This list of practice techniques has rejuvenated my enthusiasm.
Thank you, Ken!
I’m glad I could help 🙂
Keep on playing!
A well written and extremely informative article . Thank you ! Brian . Northumberland . UK .
Thank you, I hope it helped you improve your chords changing techniques.
thanks for this technique its good i like it though i am a beginner
you are welcome, stay tuned for more beginners lessons 🙂