
There are many skills that people can improve by practicing what their imagination gives them, but lucky for us, for learning guitar there are a lot of techniques that we can practice with long proven methods that will save us a lot of time if we follow them. These techniques will also give us the skills we need to play the hardest and coolest rock songs. Although some of them might be a little tricky, we just need to have a lot of patience, consistency, and dedication to keep practicing even if the progress feels slow. Just trust the gods of rock that provided us with these methods.
Now I will show you the basic techniques that you must conquer if you are starting the awesome path of guitar for rock!
Basic Strumming
This is the most basic technique for any kind of music you want to play. It consists just of attacking all the guitar strings at the same time with your fingernails, with your thumb or even with a pick. Rhythmic riffs use this technique. It sounds different if you play it from up to down or down to up; because the first one will produce a lower sound as you play the low notes first, whereas the second one will produce a lighter sound because you will play the high notes first. There is a pattern with these strokes for every song that uses basic strumming.
Technical information:
Amp setting: You can play it a clean setting for most songs, and if you are playing something heavier, you can use a smooth distortion.
This technique works perfectly with or without a pick. It depends on the style of music you are playing.
Exercise:
There are a lot of easy songs that repeat a strum pattern all over. You can play them to practice until you nail all the rhythms. Start practicing the next exercise.
- Pick a stroke pattern. They are usually written as up, down, up, down in the tablatures indicating the way you must make each stroke. This can be with arrows too. An example of a strumming pattern you can practice: down, down, up, up, down, up.
- Start slow. You can start playing the pattern really slow and gradually accelerating. This way your brain will understand the rhythm and you will be able to make it naturally, without even think about it, and that is exactly the goal. Play the pattern with your strings muted, just cover the strings with your left hand.
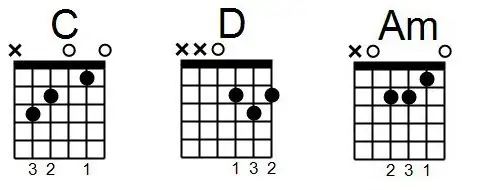
- The next thing you should do is to include a few easy chords progression with your strumming, for example, C – D – Am, as you progress you can choose a different progression.
- Play the strumming mentioned in the first point with the chords, begin slowly and raise the speed as you feel like it became easy. Keep in mind that the chords need to sound clear if they don’t lower your speed!
Practice every pattern you can, this way you will start recognizing that different songs use the same one. You can start practicing with the exercise in the next video.
I always like practicing some kind of guitar technique with an awesome song. If you like me then check out a list I made 13 Easy Guitar Strumming Patterns From Well Known Songs. I’m sure you will be able to find your favorite song there and will master strumming in no time.
Single Note Picking
While this is a fairly simple technique, beginners can struggle with getting it right. Single note picking consists of playing a single string and producing a clear and sustained sound. This might be hard for beginners because placing the fingers of the left hand in the right position in the fret and keeping them there requires some practice. To achieve the best sound, the appropriate technique is to press down hard with your fingers to keep them as close as possible to the fret the metal piece between each fretboard.
Technical information:
Amp settings: Clean or distortion depending on the songs you play. For the exercise, you better do it clean to listen to how precise and consistent is your picking.
You have to use a pick, and there are a lot of types. The only way to know which one to use is by trying them and see which one feels the most comfortable for you.
Exercise:
- Try picking each string four times from down to up. Do not worry about the frets until you dominate your picking hand.
- When you can play the previous point without looking at your picking hand, then you can start placing your left head on the fretboard. You need to place your finger as close as you can to the higher fret as you can. Start by stepping on frets 1, 2, 3, and 4 of the string you are playing while picking the way you were on step one.
- Start doing this really slow and speed up just a little bit at a time when you have it.
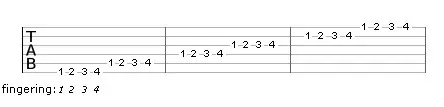
Here is the tablature, in short tab, for the current exercise. The tab consists of 6 lines that represent the strings of the guitar. The bottom line represents the 6th string and the top line represents the 1st string. The numbers on the lines represent which fret you should press with your left hand. Now you know how to read basic tabs.
If you want to know how to take the pick between your fingers, watch the next video that includes a very good exercise.
Alternate Picking
This is the right way you should always pick unless the composition says either wise. With this technique, you will start speeding up your fingers and your music playing. The solo guitarists use this technique in most rock songs, and most song solos require a great domain on this technique. The difference between single-note picking is that every note you pick with your pick needs to be in the opposite direction than before, for example, if you start picking down, the next note will be picked with up direction and the next will be down. if you feel like you the notes in the same direction too much you need to practice this technique more!
Technical information:
Amp settings: Clean or distortion depending on the song. You can use many other advanced settings to have a different flavor.
You need a pick for this.
Exercise:
- You can try the previous exercise for single picking, but now start alternating the direction of the picking between up and down on every note you hit.
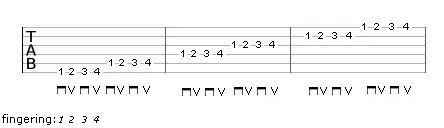
The signs below the numbers indicate the direction of the pick you must follow. V means up and the other one is down.
To properly learn this technique, you should check this tutorial:
Power Chords
Power chords include two notes in the chord, they are the most representative part of a chord since they include the root and the fifth, which is why they sound so powerful. You will see power chords used in genres like rock, heavy metal, and punk rock.
Technical information:
Amp settings: preferred to play with Distortion.
The best way to do this is with a pick.
Exercise:
The base form of these chords is like the next one:
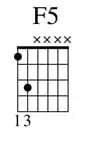
This is the F5 power chord. Place Your index finger (1st finger) is placed on the first fret and the 6th string, the ring finger (3rd finger) on the 3rd fret and the 5th string. You can play this form all along the neck of the guitar to produce different power chords.
- Strum the chord with just fifth and sixth strings and do this until you have a clean and smooth sound.
- Start sliding your hand along the guitar neck to play different chords.
- place the index finger on the following frets and keep the other finger in the same format, two frets ahead of the first finger: 1st fret = F5, 3rd fret = G5, 5th fret = A5, 7th fret B5, 8th fret C5, 10th fret D5, 12 fret E5.
- Play three times in each chord mentioned in the 2nd step.
This technique is simpler than you might think, just take a look at this video tutorial:
Palm Muting
Difficulty: Intermediate
This technique consists of strumming a chord or playing a note while muting the strings at the bridge with the right palm. A lot of rock songs use this when they are using distortion because palm muting gives a stronger and more heavy sound to the notes, which is particularly useful in rock and metal songs. This will be the most challenging technique until now for you, and you must understand that you need a lot of practice in order to dominate this. But when you do it, you will be able to play a lot of your favorite rock songs.
Technical information:
Amp setting: For this to sound right, you need distortion.
You must use a pick.
Exercise:
- Try picking some string while you put the low part of your palm gently over the string. You have to put it at the bridge of the string touching the beginning of the string just a little bit.
- Then, pick the 6th string until you find the way to produce a soft muted sound that dies shortly.
- Remember this is a challenging technique to learn since it demands a lot of tries to nail it. Be patient until you make it.
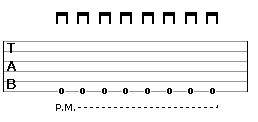
In the diagram above, P.M. stands for palm mute, and the notes or chords, in this case, a note should always be played with palm mute.
Palm-muting almost always played with a downstroke, as you can see in the diagram.
To properly learn this technique, you should consider watching the video below:
Power Chords + Palm Muting
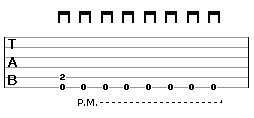
Now let’s combine the two previous techniques into one.
- strum the E5 chord
- keep the 6th string open
- place the 2nd finger on the 2nd fret on the 5th
- string the 3rd finger on the 2nd fret on the 4th string
- don’t use palm-muting on it
- pick only the 6th strings 7 more times with the palm mute technique, keep holding down the F5 power chord.
- Start slow and speed up when feeling more comfortable.
Always focus on producing the most perfect sound you can so your hands and brain learn everything right from the beginning.
Now try the next exercises to continue improving this technique.
Legato Slide
Difficulty: Easy
Sliding is moving your finger from one fret to another one without raising your finger. You can do this through any number of frets along the guitar neck and in any direction, and you can do it downwards or upwards to practice the different possibilities.
Technical information:
Amp settings: Works better with distortion.
The easiest way to do it is with a pick but you can use your fingers to.
Exercise:
- Place your 3rd finger on the 5th fret of the 3rd string.
- Then, pick the string to make it sound.
- While it is ringing, slide your finger to the 7th fret.
- Try this again but now slide it to the fifth finger.
- Practice this a few times and try the other way around, from the 7th fret to the 5th fret, still with the 3rd finger and on the 3rd string.
- Try the legato slides from different frets
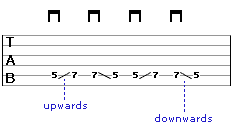
In the previous diagram, you can see the “/” symbol that stands for a slide up and a ”\” that stands for a slide down.
If you encounter any difficulties, watching this next video can help you a lot:
Hammer-Ons
Hammer-Ons have helped many solo guitarists to achieve the best solos in the world. This is something like the slide, but instead of sliding your finger, you firmly tap a higher the fret with another finger. The technique must be done from lower to higher notes. It is possible that your fingers start hurting after practicing this technique due to the force you have to use to tap the next fret. but do not worry all you need is a bit of rest and you will be able to get back on the guitar. As you progress with your practice you will notice that it will hurt much less each time you perform this technique.
Technical information:
Amp settings: Works better with distortion.
You can do it with or without a pick.
Exercise:
- Place your 1st finger on the 5th fret of the 3rd string.
- pick the 3rd string
- While the string is ringing, tap firmly with your 3rd finger on the 7th fret.
- Try this a couple of times until you dominate the exercise.
- Repeat the exercise as you place your first finger on different frets and different strings.

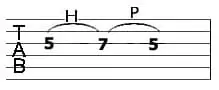
In the diagram above, there is a bridge sign between the 5th fret and the 7th. It represents the hammer-on or pulls off. The “H” stands for hammer-on.
You can watch more detailed explanations and exercises in the next video:
Pull-Offs
Pull-offs are really similar to hammer-ons. The difference is that you will go from a higher note to a lower note. In addition instead of taping the next note, you will need to pull the strung with your left-hand finger.
As in the hammer-ons, you may feel discomfort and the pain is unbearable, just take a break and return playing tomorrow. This will pass as you practice more and strengthen your fingers.
Technical information:
Amp settings work better with distortion.
It is easier with a pick
Exercise:
- Place your 3rd finger on the 7th fret in the 3rd string.
- Pick the string.
- Without muting the sound, pull off the string with your 3rd finger as downwards.
- Repeat this exercise starting from different frets and different strings.
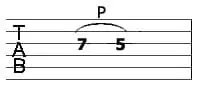
In the diagram above, there is a bridge sign between the 7th fret and the 5th. It represents the hammer-on or pulls off. The “H” stands for pull-off.
This video includes the exercise mentioned for you to master the pull-offs:
Hammer-Ons + Pull-Offs
This combination is one of the most beautiful and useful things in electric guitar playing. Almost every guitar solo uses this technique because it improves speed and gives the sound more fluidity. One of the most impressive guitar solos that uses this technique is One from Metallica. It involves other cool techniques that we will cover later, but you should analyze this solo in order to recognize the combined techniques
I recommend you to dominate both techniques before you try to join them together.
Exercise:
- Place your 1st finger on the 5th fret of the 3rd string.
- pick the 3rd string
- Hammer-on the seventh fret with your 3rd finger.
- Then, pull-off your 3rd finger to the fifth fret back.
You should watch this video to further improve your technique and practice in the most efficient way:
Bends
This may be the best technique to achieve fluid note changes. A lot of blues and rock styles use this technique. The whole idea is to literally to bend the string and to reach a higher note without changing fret or stopping the string ringing. This technique demands a lot of practice before doing it right because it is really easy to produce an awful sound when done wrong. Also, you must know that this may hurt your fingertips at the beginning because you have to apply strength in order to bend the string. This technique also depends on the type of string you are using and how old they are. I’m recommending that you will practice this just a little bit at the beginning to give your fingers the chance to adapt to this technique without hurting yourself too much.
Technical information:
Amp settings: You can use it clean or distorted, but distortion works better.
It is easier with a pick
Exercise:
- Place your 3rd finger on the 7th fret on the 3rd string.
- place your thumb over the neck of the guitar, as if you try to wrap around the neck.
- Push the string upwards, use the 3rd finger and the 2nd finer to support it, bend it until you about touching the fourth string. This will raise the tone in one.
- to check if the bend is correct you need to place your 1st finger on the 5th fret on the 2nd string while you doing the bend and pick the 2nd string.
- if you sound to match your bend is correct.
- if you have trouble doing a full bend you can do a half bend but to check it you will have to place your 1st finger on the 4th fret instead, and if the tones are a match your bend is correct.
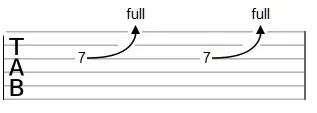
The arrow in the tab above means that you need to use the bend technique, and the “full” above it means that you need to bend the string one full step.
In the video below, you can watch more on this technique:
Vibrato
There are basically three different types of vibrato, but they all have the same purpose: to make your guitar sound a little bit more life, get more emotions to your play. The easiest type of vibrato is called hand vibrato and is the technique I am going to teach you here. To avoid the flatness that guitar strings tend to have, the proper way to use the vibrato technique is to firmly press the string with the finger of your left hand as we saw in single-note picking, but then you need to move your finger up and down while keeping the same amount of pressure on the string to avoid interrupting the sound.
This is an incredibly popular technique since it adds more dimension to any note or chord that you play. You can do it on more than one string at the same time and it has been used in several rock songs over many years.
Technical information:
Amp settings: clean or distortion.
It does not matter if you use a pick or your fingers.
Exercise:
- Place your 3rd finger on the 7th fret on the 3rd string.
- pick the 3rd string.
- while the string is ringing move the string with your 3rd finger up and down slightly.
- practice this slowly and build up the speed.
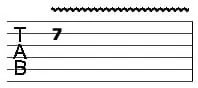
The lines above the previous tab indicate that the note should be played with vibrato for as long as the lines last.
Don’t forget to check this video to master the vibrato in no time:
Natural Harmonics
Natural harmonics are the sweetest sounds that a guitar can make. They happen at specific locations of the guitar neck that divide an open string into equal parts. To produce them you just need to put your finger over the string without pressing it in the correct location. You can find the locations by the 12th, on the 7th and at the 5th fret. When you pick the string touching slightly at those locations, it will produce a very high tone.
I recommend you to listen to Nothing Else Matters by Metallica, this song uses natural harmonics in the intro and that way you can understand the sound you are looking for.
Technical information:
Amp settings: You practice this with clean settings but the notes will last longer with distortion and delay, which will make them better for songs.
Pick or Fingers: It does not matter if you use a pick or your fingers.
Exercise:
- Touch the string in one of the correct locations.
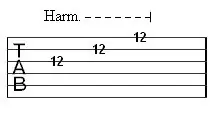
- Place just the tip of your finger over the 3rd string over the 12th fret, the location needs to be just above the fret (the metal part) and not over the fretboard
- pick the 3rd string
- if you produced a high note, you succeed, if not try again.
- Try this with all the harmonic locations which are located in the 5th fret, 7th fret, and the 12th fret.
This technique might seem a little hard at the beginning, but with the following video you will be able to nail it sooner than you think:
Conclusion
Some of these techniques can be practiced without plugging in your guitar, but you really have to practice a lot and frequent. Without constant practice, it is very difficult to achieve great results and almost every session that you have without continuity will be good for nothing.
Remember to always rest enough in order to be precise and productive on your next session.
Stay motivated. You may find yourself frustrated because you can not achieve the perfect sounds at the beginning, but keep trying and you will nail it for sure. The guitar path needs a lot of passion and dedication in order to reach the place you have in your mind.
One way to stay motivated is by watching videos of your favorite guitarists and listening to different guitar music styles. Never forget to include music theory in your training, because that is what makes the difference between an amateur and a pro. Which one do you want to be for the rest of your life?
If you found this article useful, you may want to save this pin below to your Guitar board.

Recent Posts
When learning new songs have you noticed that some of the chord sequences sound really good? But when you tried to come up with your own chord sequence, or as we call it chord progression, you found...
Some guitarists insist on buying an expensive amplifier with their electric guitar. They assume that this is a must for every type of guitarist out there. However, in some situations, this isn’t...